XGUI-3
by Xenthio
| Summary | |
|---|---|
| Description |
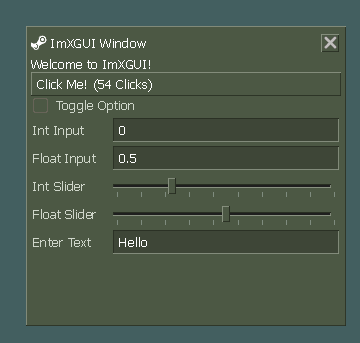
XGUI-3 is a new version of XGUI that cleans up and expands on XGUI-2. It's most notable feature is the addition of an ImGui style immediate mode UI API, which makes debugging UI and development panels quick and easy to implement. In order to use it, you must place one of these in the scene [Image] Then after that, you can call the ImXGUI.Begin functions and stuff to draw immediate mode windows in any component anywhere in update or fixedupdate. Here's an example to get you started, The API will aim to match ImGui private bool showWindow = true; private bool checkboxValue = false; private float floatValue = 0.5f; private Color colour = Color.White; protected override void OnUpdate() { // Create a window if ( ImXGUI.Begin( "ImXGUI Window", ref showWindow ) ) { ImXGUI.Text( "Welcome to ImXGUI!" ); if ( ImXGUI.Button( $"Click Me! ({clickCount} Clicks)" ) ) { Log.Info( "Button clicked!" ); } if ( ImXGUI.Checkbox( "Toggle Option", ref checkboxValue ) ) { Log.Info( $"Checkbox changed to: {checkboxValue}" ); } ImXGUI.SliderFloat( "Float Slider", ref floatValue, 0.0f, 1.0f, 0.025f ); ImXGUI.ColorPicker( "Colour", ref colour ); ImXGUI.End(); } } Or you can use the razor based GUI by creating a panel that derives from window, and adding it to the XGUIRootPanel like so Scene.GetSystem<XGUISystem>().Panel.AddChild<MyCoolWindow>();XGUI-3 is a new version of XGUI that cleans up and expands on XGUI-2.
It's most notable feature is the addition of an ImGui style immediate mode UI API, which makes debugging UI and development panels quick and easy to implement.
In order to use it, you must place one of these in the scene
[Image]
Then after that, you can call the ImXGUI.Begin functions and stuff to draw immediate mode windows in any component anywhere in update or fixedupdate. Here's an example to get you started, The API will aim to match ImGui
private bool showWindow = true;
private bool checkboxValue = false;
private float floatValue = 0.5f;
private Color colour = Color.White;
protected override void OnUpdate()
{
// Create a window
if ( ImXGUI.Begin( "ImXGUI Window", ref showWindow ) )
{
ImXGUI.Text( "Welcome to ImXGUI!" );
if ( ImXGUI.Button( $"Click Me! ({clickCount} Clicks)" ) )
{
Log.Info( "Button clicked!" );
}
if ( ImXGUI.Checkbox( "Toggle Option", ref checkboxValue ) )
{
Log.Info( $"Checkbox changed to: {checkboxValue}" );
}
ImXGUI.SliderFloat( "Float Slider", ref floatValue, 0.0f, 1.0f, 0.025f );
ImXGUI.ColorPicker( "Colour", ref colour );
ImXGUI.End();
}
}
Or you can use the razor based GUI by creating a panel that derives from window, and adding it to the XGUIRootPanel like so
Scene.GetSystem<XGUISystem>().Panel.AddChild<MyCoolWindow>();
|
| Votes | 11 0 9 |
| Error Rate | 0% |
| Reviews |
1 reviews
100% Recommended (1)
0% Promise (0)
0% Needs Work (0)
|
| Data | {} |